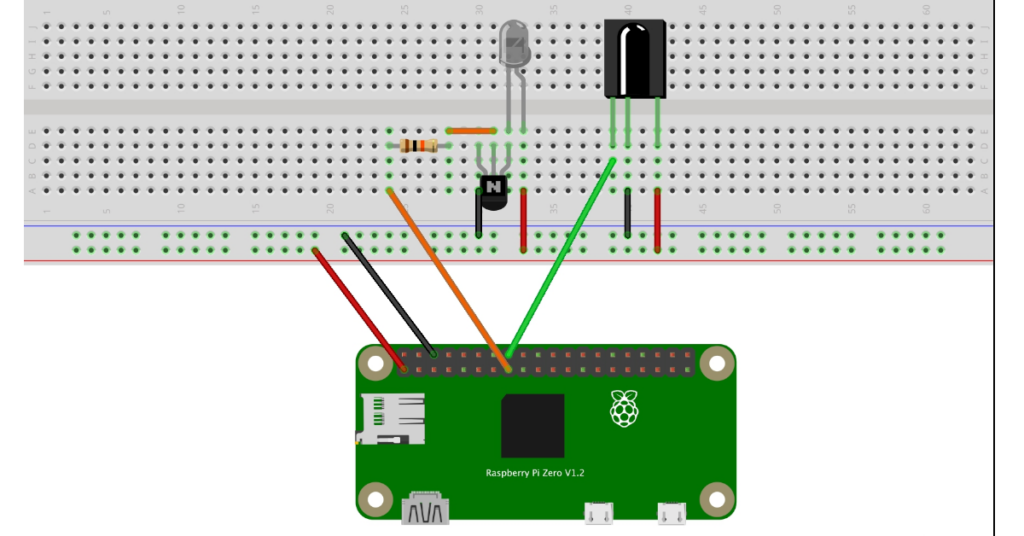
This is part two of the Universal Rremote for OpenHAB project. In this part, we will install and configure the Lirc software on our Raspberry Pi. Part 1 of the article (Building the hardware) is located here: Building an IR Universal Remote for OpenHAB (Part 1)
Installing the Software
The program that does all the work is called Lirc (Linux Infrared Remote Control). Lirc is a package that allows you to decode and send Infrared signals of many (but not all) commonly used remotes.
This documentation will assume you already have installed Raspbian (Stretch) on an SD card and it is running on your Raspberry Pi Zero. If you haven’t already done this, then you should head over to this page for complete instructions on how to install a fresh image. This project was built on Raspbian Stretch Lite but any modern version of Raspbian should work.
First we need to install the Lirc package.
$ sudo apt-get update
$ sudo apt-get install lirc
Next edit the modules file in /etc/modules and add in the following lines
lirc_dev
lirc_rpi gpio_in_pin=23 gpio_out_pin=22
Next, edit the /boot/config.txt file and add the following line t othe end of it:
dtoverlay=lirc-rpi,gpio_in_pin=23,gpio_out_pin=22
Update the following lines in /etc/lirc/lirc_options.conf
driver     = default
device    = /dev/lirc0
listen      = 0.0.0.0:8765
Restart the lirc daemon now to make sure it can start and stop
$ sudo service lircd stop
$ sudo service lircd start
Lirc also starts some services to allow the IR signals to emulate a keypress or mouse device. We will not need this in our setup so lets disable these services from starting. (they are started from systemd (if available).
$ sudo systemctl disable lircmd.service
You can now reboot the Raspberry Pi Zero to make sure everything starts OK.
reboot
Testing your IR Receiver
We will not test the IR input to make sure that your project can receiver IR signals. For this testing to work, we need to first turn off the Lirc daemon so that we can use the device.
$ sudo service lircd stop
Then startup the mode2 program that came with Lirc. This program will listen for IR pulses from yuor remote control and display the pulse and space values on the screen.
$ mode2 -d /dev/lirc0
Press buttons on your remote control while pointing it at the IR receiver. You should see output on the screen similar to this (your number values will be different).
pulse  535
space 1738
pulse  580
space 2636
pulse  546
space 1730
If you don’t see anything displayed on the screen when you press a button, then something is wrong. Double check your curcuit wiring, make sure that the lirc daemon is not running, and that your remote works.
Adding a Remote Control
The ability for Lirc to decode and send IR command is great but it starts to get real useful when you can clone remotes. This allows you to make the Lirc act as a remote and send the same codes as your existing remote. In order to clone a remote, you either need to get a copy of a pre-recorded remote, or create one for yourself. The first thing I did was check the Lirc database to see if someone has already recorded my remote. You can access the Lirc Remote database to see if your remote is there. If it is a new remote them it might not be listed.
Another option to find and existing Lirc remote is using the command line irdb tools. This is a set of tools that will search the database and download a config file for you. For example, If I was looking for a Motorola VIP 1200 remote, I might do this:
$ irdb-get find motorola
# lots of remotes listed...
$ irdb-get download motorola/VIP_1200.lircd.conf
$ cp VIP_1200.lircd.conf /etc/lirc/lircd.conf.d/VIP_1200.lircd.conf
If you are lucky enough to find your remote control listed in the database, then download the file and place it in /etc/lirc/lircd.conf.d/
Recording a Remote Control
If your remote is not listed in the database (none of mine where listed) then you will have to record (Clone) your current one. Run this command and then follow the prompts on the screen to record your remote. NOTE: IR is tricky and not a very percise encoded signal. Lirc does a great job of trying to figure out your remote but it does not understand everything.
$ sudo service lircd stop
$ sudo irrecord --driver default --device /dev/lirc0 my-remote.lircd.conf
At the end you will have to copy your remote conf file you created into the /etc/lirc/lircd.conf.d/ directory. While recording the remote, it works best of the key names you enter are ones it knows about (the namespace). To get a list of all the Key names it knows about use the following command:
$ sudo irrecord --list-namespace
Once you have added your remote into the cofig directory, then reboot yuor Raspberry Pi.
$ reboot
After the reboot, you can test your IR remote file and the IR receiver by running ther following command:
$ irw
As you press buttons on the remore, you should see it display the Key name and the remote name on the screen.


Very soon this site will be famous amid all blogging and site-building users, due to it’s nice posts